Choosing the Right Pumpkin Seeds
How to plant pumpkin seeds – Selecting the appropriate pumpkin seeds is paramount for a successful harvest. The vast array of varieties available, each with its unique characteristics and requirements, necessitates careful consideration before planting. Ignoring this crucial step can lead to disappointing yields or pumpkins unsuitable for your intended purpose. The following information will help navigate the complexities of pumpkin seed selection.
Pumpkin Seed Varieties and Characteristics
Pumpkin varieties differ significantly in size, shape, color, taste, and growing requirements. Understanding these differences is essential for choosing seeds that thrive in your specific climate and soil conditions. Some varieties are better suited for carving, while others excel in pies or other culinary applications. Consider the ultimate use of your pumpkin when making your selection. Ignoring these factors can result in pumpkins that are either too small, too large, or simply lack the desired qualities.
Comparison of Popular Pumpkin Varieties
The following table compares several popular pumpkin varieties, highlighting key characteristics to aid in informed decision-making. Remember that growing conditions can influence these characteristics, so local climate data should always be considered.
| Variety | Maturity Time (Days) | Average Size (lbs) | Ideal Growing Conditions |
|---|---|---|---|
| Connecticut Field | 90-100 | 10-20 | Full sun, well-drained soil |
| Howden Biggie | 100-110 | 20-50+ | Full sun, fertile soil, warm climate |
| Jack O’Lantern | 95-105 | 5-15 | Full sun, well-drained soil, moderate climate |
| Baby Boo | 90-100 | 1-3 | Full sun, well-drained soil, adaptable |
Seed Quality and Viability
High-quality seeds are the foundation of a successful pumpkin crop. Viable seeds are crucial for germination and healthy growth. Choosing seeds from a reputable source is the first step in ensuring viability. Seeds should be plump, firm, and free from blemishes or damage. Discolored or shrunken seeds often indicate low viability.
A simple test involves placing a few seeds in a damp paper towel; those that sprout within a few days are likely viable. Planting low-quality seeds is a gamble that often results in poor germination rates and stunted growth, wasting time, effort, and resources.
Preparing the Planting Site

The success of your pumpkin patch hinges on meticulous site preparation. Ignoring this crucial step is akin to building a house on a cracked foundation – destined for collapse. Optimal soil conditions are non-negotiable for healthy pumpkin growth, demanding a strategic approach to ensure a bountiful harvest. Failing to properly prepare the soil translates directly into reduced yields, increased susceptibility to disease, and ultimately, a disappointing harvest.
This is not a matter of preference; it’s a fundamental requirement.Pumpkin plants, like all living things, have specific needs. They thrive in well-drained, fertile soil, demanding a careful assessment of your chosen planting area. Ignoring these needs will result in stunted growth and diminished yields. This isn’t merely gardening advice; it’s a statement of biological fact.
Soil Composition and pH, How to plant pumpkin seeds
Pumpkin plants prefer a slightly acidic to neutral soil pH, ideally between 6.0 and 6.8. Soil pH outside this range can hinder nutrient uptake, impacting growth and fruit production. A soil test, readily available from most garden centers, is the most effective way to determine your soil’s pH. Failing to perform this test is akin to navigating without a map – you might reach your destination, but it will likely be far more difficult and less efficient.
Amendments such as lime (to raise pH) or sulfur (to lower pH) can be applied based on the test results to bring the soil into the optimal range. Precise adjustments based on your specific soil analysis are essential for maximizing yield.
Soil Amendment and Enrichment
Pumpkins are heavy feeders, requiring nutrient-rich soil for optimal growth. Sandy or clay soils often lack the necessary organic matter to support robust pumpkin plants. Amending poor soil is not optional; it’s a prerequisite for success. Adding compost, well-rotted manure, or other organic matter improves soil structure, drainage, and fertility. This is not merely a suggestion; it’s a demonstrable improvement to soil health and plant vigor.
The amount of amendment needed depends on the soil’s initial condition, but a generous application is usually warranted. Consider the soil’s texture; sandy soils need more organic matter to retain moisture, while clay soils benefit from amendments that improve drainage. For example, adding several inches of compost to a sandy soil could dramatically improve its water retention capabilities, whereas adding perlite to heavy clay could help prevent waterlogging.
Planting Area Preparation
Preparing the planting area involves more than just amending the soil. This is a multi-stage process demanding attention to detail. Begin by clearing the area of weeds, rocks, and debris. This prevents competition for nutrients and water. Next, till or loosen the soil to a depth of at least 12 inches.
This allows roots to penetrate deeply and access nutrients and moisture more effectively. A poorly prepared planting area will severely limit the plant’s ability to thrive. Finally, incorporate the soil amendments, evenly distributing them throughout the prepared area. This ensures uniform nutrient availability and promotes consistent growth. This isn’t just about planting pumpkins; it’s about creating a thriving ecosystem for them.
Sowing Pumpkin Seeds
The act of sowing pumpkin seeds, seemingly simple, is a crucial step demanding precision and understanding of environmental factors. Failure to properly sow seeds can result in poor germination rates, stunted growth, and ultimately, a disappointing harvest. This section will dissect the process, offering a critical analysis of optimal timing and techniques.Planting pumpkin seeds outdoors requires a keen awareness of your local climate.
Ignoring the realities of frost and temperature can lead to catastrophic seed failure. The political reality is this: a farmer who plants too early risks significant financial losses, while delayed planting might mean missing optimal growing conditions and reduced yields. This is a high-stakes gamble, and the consequences of poor planning are stark.
Optimal Planting Time
The ideal time to sow pumpkin seeds directly into the ground is after all danger of frost has passed. This varies significantly based on geographic location. For example, in regions with a longer growing season, like parts of the Southern United States, planting can begin as early as April or even March. However, in northern climates, waiting until late May or even early June is often necessary.
Consulting a local agricultural extension office or using online frost date calculators specific to your area is crucial. Failing to do so is akin to entering an election without knowing the electorate.
Direct Sowing Techniques
The process of directly sowing pumpkin seeds is straightforward, but precision is paramount. The following steps detail the procedure:
1. Prepare the soil
Ensure the soil is loose, well-draining, and enriched with compost. Compacted soil hinders root development, a critical factor in pumpkin growth. Neglecting this step is like campaigning without a viable platform.
2. Create planting holes
Dig shallow holes, approximately 1-2 inches deep. The depth should be consistent across all planting locations for uniform germination. Inconsistent depth leads to uneven growth, similar to how inconsistent messaging can undermine a political campaign.
Planting pumpkin seeds is straightforward: prepare loose soil, sow seeds about an inch deep, and keep them moist. For a similar but longer-term project, consider the rewarding experience of growing a pomegranate tree; learn more about this process by visiting how to plant pomegranate tree from seeds. Once established, both pumpkins and pomegranates require consistent watering, though pumpkins mature much faster, providing a quicker harvest.
3. Plant the seeds
Place 2-3 seeds per hole, spacing holes approximately 4-6 feet apart for larger varieties, and 2-3 feet apart for smaller varieties. This spacing allows for adequate growth and prevents overcrowding. This strategic spacing mirrors a political party’s allocation of resources for maximum impact.
4. Cover the seeds
Gently cover the seeds with soil and firm the soil lightly. Avoid packing the soil too tightly, which could suffocate the seeds. This step mirrors the careful crafting of a political message – too much pressure can be counterproductive.
5. Water gently
Water the planted seeds thoroughly, ensuring the soil is moist but not waterlogged. Overwatering can lead to root rot, a common and devastating problem. This highlights the need for careful resource management, similar to a government’s budgetary considerations.
Planting Depth and Spacing Visualization
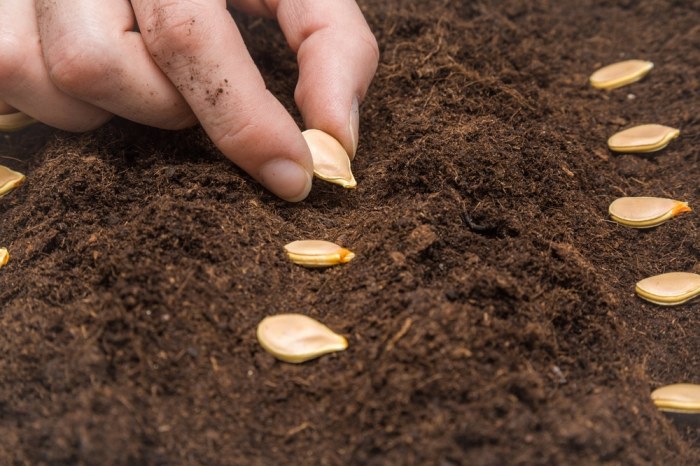
Imagine a shallow trench, approximately 1-2 inches deep. Within this trench, small mounds of soil are created, spaced 4-6 feet (or 2-3 feet for smaller varieties) apart. Two to three pumpkin seeds are placed within each mound, then gently covered with soil. This creates a clear, organized planting pattern that maximizes space utilization and promotes healthy growth.
This visual representation underscores the importance of planning and efficient resource allocation. Failure to visualize and plan properly mirrors a political campaign that lacks strategic vision.
Harvesting Pumpkins: How To Plant Pumpkin Seeds

The seemingly simple act of harvesting pumpkins is fraught with political undertones, reflecting the complex power dynamics inherent in our food systems. From the corporate control of seed varieties to the exploitation of farm labor, the seemingly idyllic image of a pumpkin patch masks a web of socio-economic issues. Understanding the harvesting process, therefore, requires a critical eye, acknowledging the larger context within which this seemingly simple task unfolds.The ripeness of a pumpkin is not merely a matter of aesthetic judgment; it’s a crucial factor determining its shelf life and market value.
A premature harvest translates to financial losses for the farmer, while overripe pumpkins are susceptible to rot and disease, impacting both profitability and food security. The economic realities associated with pumpkin production highlight the precarious position of many farmers, constantly navigating the tightrope between maximizing yield and minimizing waste.
Pumpkin Ripeness Indicators
Identifying a ripe pumpkin requires a multifaceted approach. The color should be a deep, rich orange or the appropriate color for the specific variety; a pale or dull hue suggests immaturity. The rind should be hard and difficult to pierce with a fingernail. A dull thud when thumped indicates ripeness, while a hollow sound points to internal decay.
Finally, the stem should be dry and easily detached from the vine. These indicators are not merely botanical facts; they represent the culmination of months of labor, planning, and investment, each element contributing to the final value of the harvest. Failure to properly assess these factors can have significant financial consequences for the producer.
Harvesting Techniques
Harvesting pumpkins requires a delicate touch. Using a sharp knife or pruning shears, cleanly sever the stem, leaving a couple of inches attached to the pumpkin. Avoid pulling or twisting the pumpkin, as this can damage the rind and compromise its shelf life. Lifting the pumpkin carefully from the ground, placing it gently into a basket or container, is crucial to prevent bruising.
The care taken in harvesting mirrors the care and attention invested throughout the growing season; it is the culmination of months of effort, not just a simple act of picking. Negligence at this stage can negate the previous months of work.
Pumpkin Storage Strategies
Proper storage is crucial for extending the shelf life of harvested pumpkins.
The following are critical steps for maximizing the shelf life of pumpkins:
- Cleanliness: Before storage, carefully clean any dirt or debris from the pumpkin’s surface using a soft brush or cloth. This prevents the spread of pathogens and extends shelf life.
- Cool, Dry Environment: Store pumpkins in a cool, dry, well-ventilated area, away from direct sunlight and moisture. Temperatures between 50-55°F (10-13°C) are ideal.
- Avoid Contact: Ensure pumpkins are not stacked directly on top of each other, as this can lead to bruising and rotting. Space them adequately to allow for air circulation.
- Regular Inspection: Regularly inspect pumpkins for signs of rot or decay. Any affected pumpkins should be removed immediately to prevent contamination of the others. This is crucial for preventing the spread of disease and preserving the remaining harvest.
Detailed FAQs
What should I do if my pumpkin seedlings are wilting?
Wilting seedlings often indicate insufficient watering or a problem with the root system. Check soil moisture; water deeply if dry. Gently examine the roots for rot or damage; replant if necessary.
How can I prevent pests from damaging my pumpkins?
Regularly inspect plants for pests. Use organic pest control methods like insecticidal soap or neem oil. Consider companion planting with herbs like basil or marigolds to deter pests naturally.
When is the best time to harvest pumpkins?
Pumpkins are ready for harvest when the rind is hard, and the stem is dry and woody. The color should be deep and vibrant. A good thump should produce a hollow sound.
Can I save seeds from my harvested pumpkins to plant next year?
Yes, you can! Allow the pumpkins to fully cure. Then, scoop out the seeds, clean them thoroughly, and allow them to dry completely before storing in a cool, dry place.

